What to Expect on the Day of a Concrete Pump Pour
If you have a concrete pump scheduled, knowing exactly what will happen on pour day helps your project run smoother, safer, and faster. In this guide, we walk you through the full process step by step, from when our operator arrives on site to final cleanup and paperwork, so there are no surprises on pumping day. This is based on real job site experience across residential, commercial, infrastructure, and ICF projects throughout Ontario.
Here is a quick checklist that makes it easier for you and your team to get ready for concrete pumping day:
| Stage | Checklist Item | Why It Matters |
|---|---|---|
| Before Arrival | Clear access routes to the pump location | Prevents delays and unsafe maneuvering |
| Confirm pump type (boom or line pump) | Ensures correct setup and space requirements | |
| Verify ground conditions are stable | Required for safe outrigger deployment | |
| Identify concrete placement areas | Avoids confusion once pumping starts | |
| Set up proper lighting (especially basements/interiors) | Improves safety, accuracy, and speed | |
| Confirm washout plan and location | Keeps site clean and compliant | |
| On Arrival | Meet pump operator and review site layout | Aligns expectations before setup |
| Walk access routes and placement areas together | Catches issues early | |
| Confirm pour sequence and flow direction | Prevents rework and stoppages | |
| Pump Setup | Allow space for outriggers (boom pumps) | Required for safe operation |
| Ensure clear line path (line pumps) | Reduces trip hazards and kinks | |
| Keep non-essential crew clear of setup area | Improves safety | |
| Before Pumping | Confirm pump inspection is complete | Prevents mechanical issues |
| Ensure line is properly primed | Reduces risk of blockages | |
| Confirm communication method (verbal or radio) | Allows instant stop if needed | |
| During Pour | Maintain clear communication with operator | Controls flow and placement |
| Monitor hose movement and pressure | Prevents blowouts or line issues | |
| Adjust flow speed as needed | Improves finish quality | |
| After Pour | Allow pump to clear remaining concrete | Reduces waste and cleanup time |
| Direct washout to approved area or bag | Keeps site clean | |
| Confirm cleanup is complete | Avoids hardened concrete issues | |
| Wrap-Up | Complete paperwork and sign-off | Closes job properly |
| Confirm site is left clean and safe | Professional handoff |
Before the Pump Arrives What You Should Have Ready
A successful concrete pour starts before the pump even pulls onto your site.
When our operator arrives, the first thing they do is connect with the site crew. Sometimes the setup is straightforward. Other times, it requires a quick walk-through to confirm access, placement areas, and safety considerations.
Before we get there, it helps if access routes are clear and safe, excavated areas are stable and walkable, you know exactly where the concrete needs to go, and lighting is already set up. Lighting is one of the most overlooked details, especially for basements or interior pours. We have been on underground pours where crews had to rely on flashlights because work lights were not ready. Proper lighting makes the job faster, safer, and less stressful for everyone involved.
If your job involves interior access, tight entries, or unusual routing, we also recommend reviewing how we handle complex layouts in our guide on concrete pump setup for complex sites.
Step 1: Site Walk and Job Confirmation
Once on site, our operator will meet the crew lead or foreman, walk the work area, confirm pour locations and sequence, and decide on the safest and most efficient pump position.
This step ensures everyone is aligned before concrete arrives. It also helps avoid last-minute changes once trucks are already lined up. On tighter or more complex sites, like bridge work, restoration, and municipal infrastructure, that planning step becomes even more important. If you run those types of jobs, you can also see our approach on the infrastructure concrete pumping page.
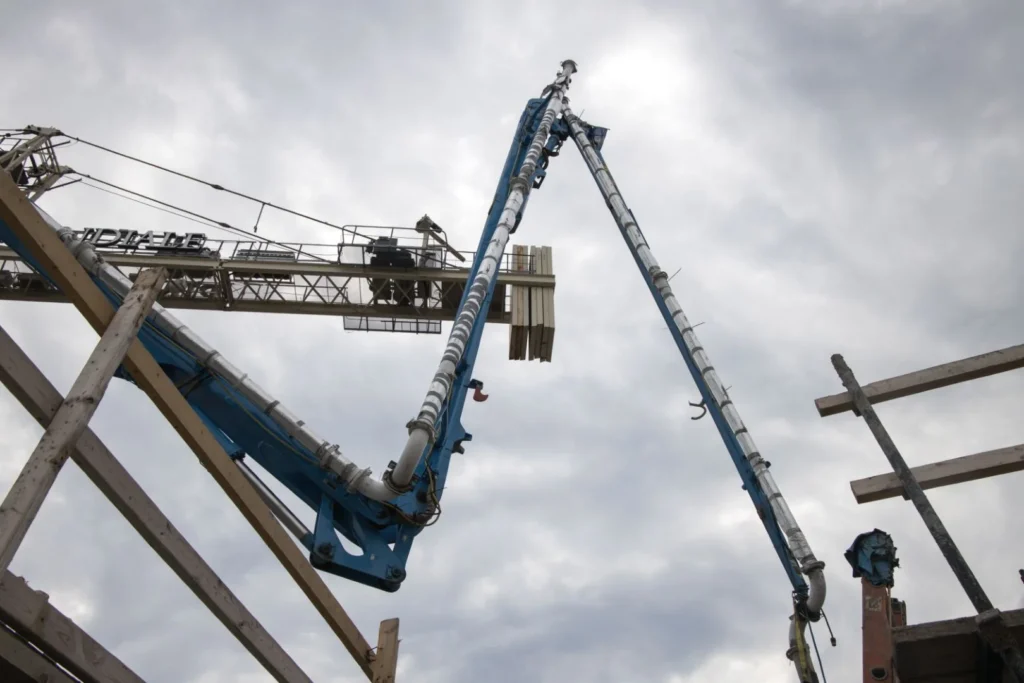
Step 2: Positioning the Concrete Pump
Next comes positioning the pump.
Depending on the job, we may be using a boom pump or a line pump. Boom pumps require enough room for outriggers and safe boom movement, while line pumps require a clear route to lay pipe or hose.
For boom pumps, we park the truck in the safest possible location, deploy outriggers on stable ground, and confirm overhead clearance. For line pumps, we lay the line along the planned route using steel pipe or flexible hose depending on access and site conditions.
If you are unsure which setup is best for your project, our concrete pump trailer and line pump services page breaks down where each option works best. If the job is in the city with tight staging, you can also check our Toronto concrete pumping services page for common constraints we plan around.
Step 3: Pump Inspection and Final Checks
Even though every pump is inspected daily before leaving the yard, our operator always performs another full check once everything is set up on site.
This includes inspecting hoses, checking clamps and connections, and confirming all components are secure. Only after everything looks right do we move on to priming the pump.
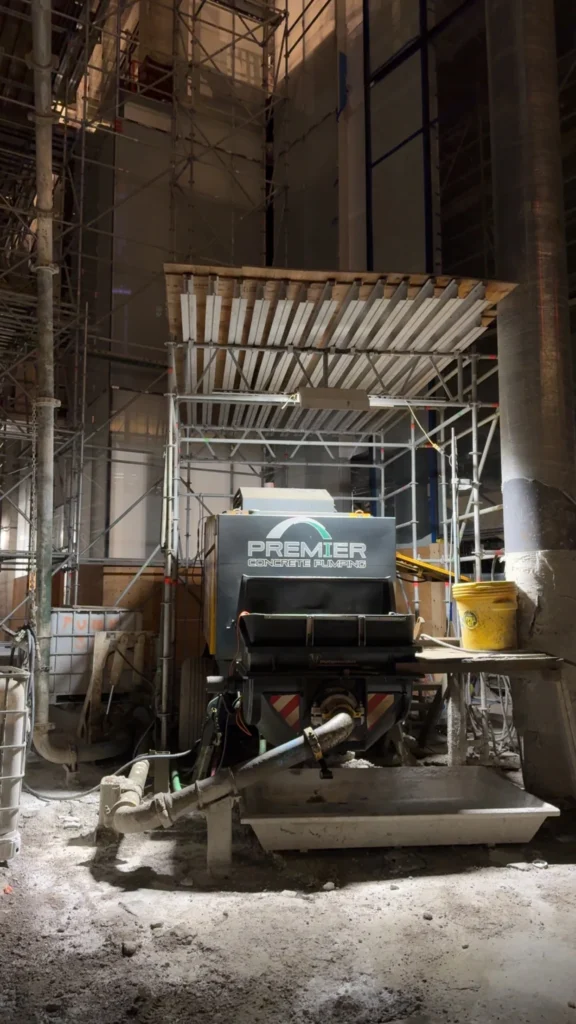
Step 4: Priming the Pump
Priming prepares the pump line so concrete flows smoothly without blockages.
This can be done using grout supplied by the ready-mix provider or with our own pump primers, depending on the pump type and job conditions. Once the line is primed, the pump is ready, and we wait for the concrete trucks to arrive.
If you want a deeper breakdown of how line size and mix choices affect pumping performance, read choosing concrete mix and pump line size.
Step 5: Concrete Arrival and Pumping Begins
When the ready-mix trucks arrive, they back up to the pump and discharge concrete into the hopper at the rear of the truck. From there, the pump moves the concrete through the line or boom to the placement area.
On boom pump jobs, the operator uses a remote control to guide the boom while staying in constant communication with the crew. On line pump jobs, the hose is guided manually, and flow is adjusted as needed.
Clear communication is key. The crew can request faster or slower flow, pauses, or small adjustments to placement. This coordination keeps the pour controlled and efficient, whether it is a residential slab or a larger commercial placement.
Step 6: Managing Flow Pressure and Safety
Throughout the pour, our operator closely monitors pressure, flow consistency, hose movement, and overall safety. If anything looks off, pumping stops immediately.
On certain jobs, such as basement pours or confined spaces, the operator may be outside while the hose crew is inside. In those cases, clear verbal signals or radios are used so the pump can be stopped instantly if needed.
Step 7: Completing the Pour and Clearing the Line
Once the pour is complete, we pump out as much remaining concrete as possible from the hopper and line. This reduces waste and makes cleanup faster.
Any leftover material is directed to a washout bag or a designated washout area on site, depending on what is available and approved. Proper washout planning helps keep your site clean and compliant.
Step 8: Cleaning the Pump and Equipment
Cleaning is a critical part of the day.
The hopper is rinsed, all hoses and pipes are flushed, and any excess buildup is removed before it hardens. For boom pumps, the boom is folded down safely. For line pumps, hose and pipe sections are disconnected and loaded back onto the truck one by one.
This process ensures the equipment is ready for the next job and helps prevent issues later on.
Step 9: Paperwork Sign Off and Departure
Before leaving the site, paperwork is completed, time and materials are documented, and everything is signed off. Once that is done, the operator packs up and heads back to the yard.
That is the full concrete pumping process from arrival to departure.
Is the Process the Same for Boom Pumps and Line Pumps?
Yes, the overall process is the same.
The only real difference is at the beginning and end. Boom pumps involve unfolding and folding the boom, while line pumps involve laying out and packing up pipe or hose. Everything else, including inspection, priming, pumping, communication, and cleanup, follows the same steps.
Why Knowing the Process Matters
We get a lot of questions from contractors about what happens at each stage of a concrete pump job. Knowing the process helps you prepare your site properly, avoid delays, improve safety, and keep the pour moving efficiently.
This is especially important if it is your first time using a pump or if the job involves specialized work like ICF. If you are doing insulated formwork, you may also want to read what is an ICF concrete foundation and our service page on ICF concrete pumping.
Related Reading
Final Thoughts
Concrete pump day does not have to be stressful. When you know what to expect and prepare properly, the process is smooth, efficient, and safe.
If you are planning an upcoming pour and want to make sure everything is set up right, our team is always happy to walk through the details with you before we arrive on site. You can also learn more about how we operate and what you get when you work with us on Why Choose Premier Concrete Pumping.